
by Betty Kim
Intro
In my first post, I talked about my first endeavor to “remix” the Brut through digital collage. Using Procreate for iPad, I explored permutations of the Brut with texture, color, and other visual motifs in mind. The artistic process brought up questions about visual representations of literary works, especially with regards to the issue of vernacular vs. official digitization.
In this post, I’ll be talking about analog collaging as remix in hopes that it’ll lead us to interesting discoveries in the same vein.

Beginning stages of the collage

Mixing and matching pieces pre-gluing
The Collaging Process: Observation and Planning
After viewing and photographing the manuscript at Rauner Special Collections Library, I began working on the analog collage.
The technical undertakings associated with the analog “remix” were entirely different from the very beginning. To create an analog collage of the Brut, I had to use print-outs of photos of the manuscript.
I started out by printing out around 20 pages of full-color pictures of the Brut; half were photos I had taken myself at Rauner, and the other half were scans from the DxDL website.
Then, I began brainstorming possible structures for the piece by doing what I always do when preparing to work on a collage: looking through the materials, spreading them all out in front of me, and trying to identify what parts would work together compositionally. As with the digital collaging process, I didn’t really have a concrete objective; the purpose was to play with the Brut’s cover and first few leaves with no particular end goal in mind, letting my intuition guide the cutting and pasting. If there was any goal at all, it was to loosely represent the visual elements of the manuscript’s cover and first few leaves.
The brainstorming part of the process took longer than it did with the digital collage, partly because working with print-outs means that once you cut or glue something, it’s going to stay that way. With a digital collage, you can re-use an image as many times as you like; swipe right to duplicate it, tap with two fingers to undo a dramatic change, and so on. With an analog collage, you’re more vulnerable in that the choices of placement you make are permanent once glue is involved. This isn’t necessarily a drawback — in fact, it can be freeing to not have the option to click “undo” on a whim. It encourages you to see “mistakes” as opportunities to work creatively with what you already have, instead of obsessively undoing and redoing until you finally give up and reluctantly accept the progress you’ve made so far.
Though there were many differences between the digital and analog collaging processes, one thing remained constant: I found myself especially drawn to the aesthetics of the cover. Eventually, this led me to visualize a collage in which the parts of the cover served as the centerpiece, with parts of the first few leaves “spilling” out.

My assistant Bobo at work in our home studio
The Collaging Process: Ripping and Pasting
After I’d established an overarching concept for the collage, the rest of the collaging process flowed more intuitively. I decided to cut out parts of each print-out by ripping, rather than cutting, to achieve a more organic look. Since the manuscript itself has raw edges and other effects of aging, I wanted to maintain that aesthetic. I also decided to create a woven pattern at the bottom of the collage, partly because I thought it might be an interesting way to represent multiple pages simultaneously.
One particular element of this collage is the fact that it is double-sided. This was not an intentional choice starting out; it was actually an accident that resulted from my forgetting to print one-sided. At one point in putting together the “main” side, however, I happened to turn it over and realize that the other side was visually interesting, too. I decided to use that to my advantage, using each side to experiment in different ways.
On one side, I decided to use “outside materials” (which I initially planned not to use) to see how this would change the nature of the collage. I used paint to highlight some of the colors already present, trying to make them come out of the texture more prominently. Then, I tried illustrating a landscape of sorts, imagining that the story, with its words all jumbled together in the collage, was coming out of the knots and sutures I’d created from the original material (or, at least, a photo or representation of the original manuscript).

Using a deep blue acrylic paint to “illuminate” the collage

Traces of blue and green were visible in the original manuscript; I tried to draw the eye to the fading colors by decorating the collage with acrylic paint
Obstacles and issues with analog collaging
Though I work primarily with analog collage in my artwork, I found this particular analog collage process very frustrating. Most of the issues I encountered had to do with the logistics of analog collaging; for example, the added preliminary step of printing complicated things in terms of scale and color. Some images printed slightly bigger or smaller than I expected them to, which totally changes the way a collage will work compositionally. There was also the two-sided printing snafu I mentioned earlier, though it eventually made for an interesting artistic experiment (and now that I think about it, actually made the collaging experience more similar to how it would’ve been if I were using the real manuscript!)
Analog collages also flatten and distort 3D textures in several ways. First, during the aforementioned photo-taking process: the original manuscript in all its 3D glory becomes a 2D photo. Second, during the print-out process: the bumps and grooves on the original manuscript simply become darker and lighter colors on a thin sheet of paper. Third, to represent the final product and show it off on the Internet, you have to take a picture of the collage, yet again rendering 3-D textures in a 2D form.
Interestingly, artist and Remix the Manuscript team member Benjamin Patrick’s artistic process involves reprinting digital art onto vellum; perhaps this is his way of navigating the material changes that result from re-working the original parts of a manuscript.
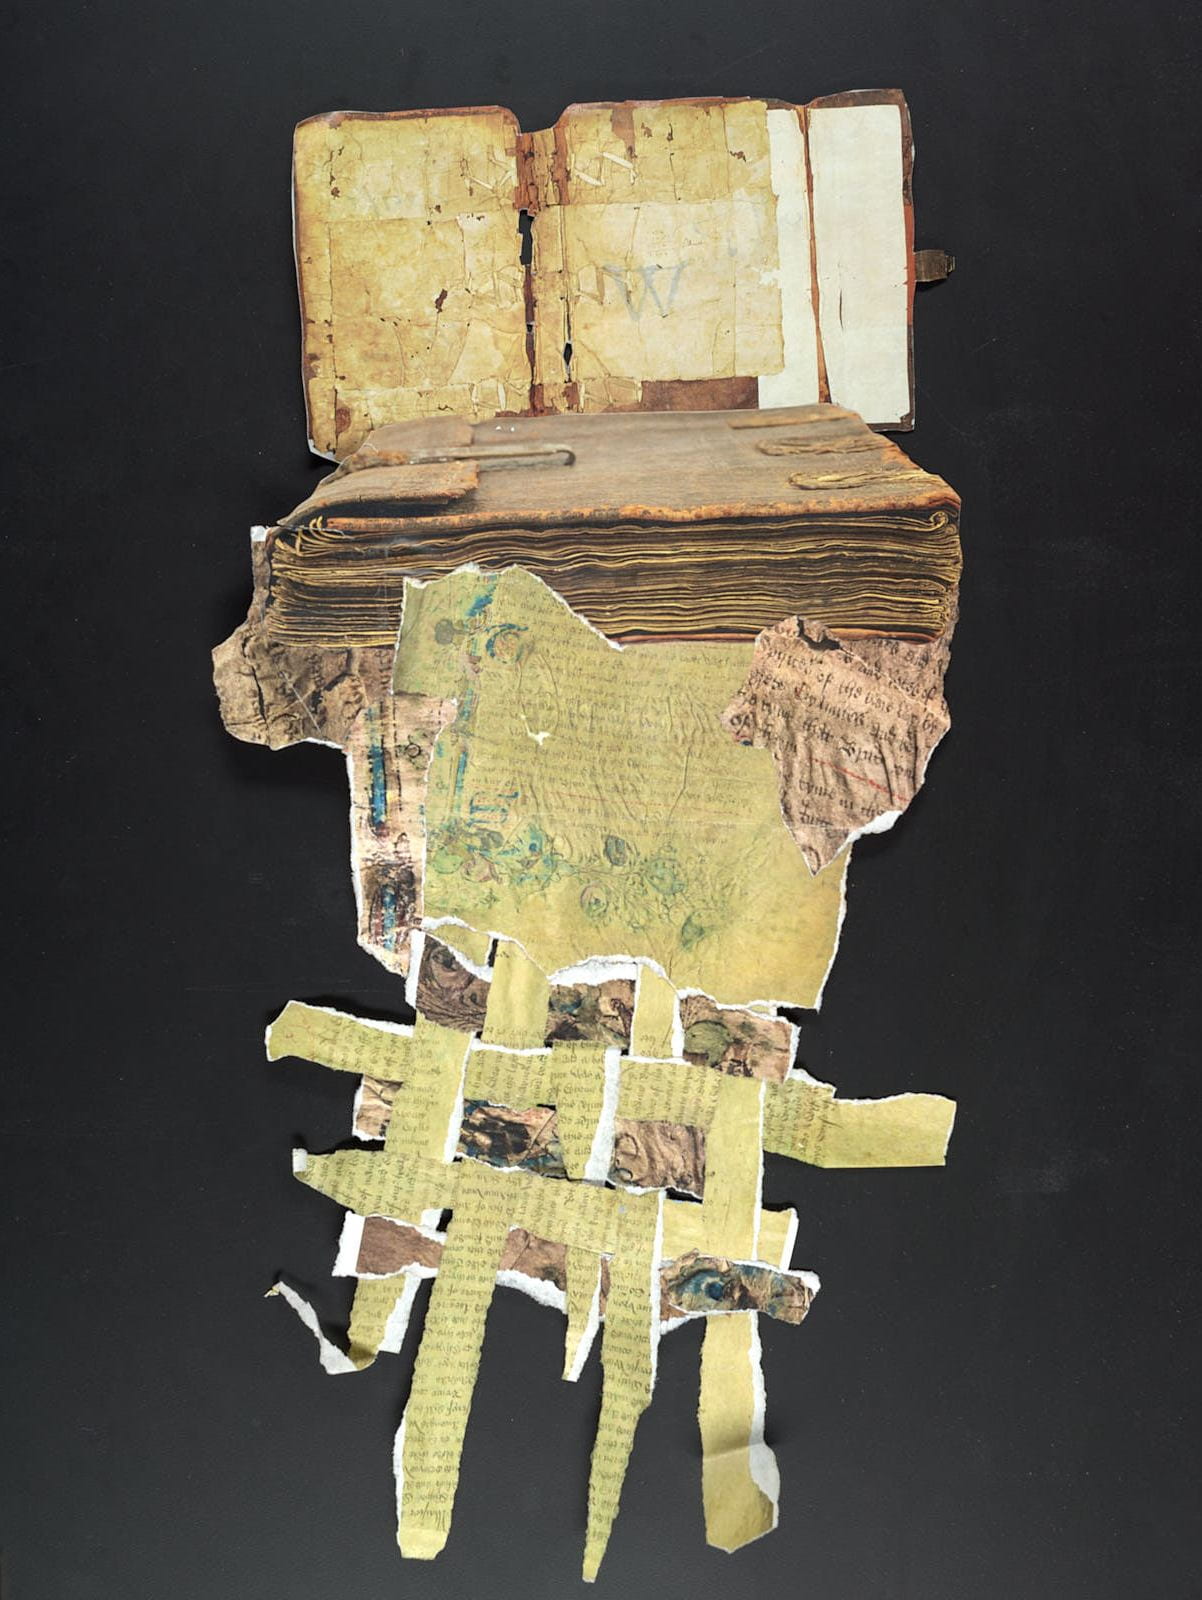
The final product
Conclusion/What next?
Rather than answering my questions about collaging as remix, the analog collaging process brought up some new questions. These art experiments seem to be begging the questions: how can we represent analog materials digitally? How can we represent analog materials that have become digital materials in analog forms? When we put the original work through several representational sieves, going from analog to digital to analog again, what can we learn about visual (re)presentation?
Maybe all of these questions can be summed up in one question: how can we represent canonical works through non-canonical art-making, and what does this process tell us? In my next blog post, I’ll be comparing and contrasting the digital and analog collaging processes, going into detail about the obstacles and particularities I encountered. Hopefully, we will find more answers than questions along the way!
